Ubuntu Server 22.04 LTS with Remote LUKS Unlock - Migrating to Cockpit (Part I)
In Migrating to Cockpit (Part I), we'll setup an Ubuntu Server 22.04 LTS installation with LUKS encryption and setup dropbear to remotely unlock the disk via SSH.


This is a multi-part series I've decided to write in an effort to replace my existing Proxmox installation. Proxmox seems to be a fairly popular choice for people setting up servers/home labs and has been a nice starting point for me over the last two years.
Originally when I started my plans to migrate away from Proxmox, I was going to use AlmaLinux. I started studying for the RHCSA certificate earlier this year and thought it would be a great way to quickly sharpen my skills. After some experimentation, I decided it was best to use something I was most familiar with (Debian-based) because I depend on this server for a lot of things and I knew I could maintain it without any uncertainty.
I've had a persistent issue with Proxmox where all storage devices (aside from the host disk) disappear on a reboot and require several reboots (if not a full shutdown) to resolve. I'm not all that familiar with all the commands Proxmox offers and when the Web UI breaks or becomes unresponsive (typically when those drives disappear), I'm running in circles trying to get my VMs back online.
Combine these issues with my desire to become a System Administrator, I decided to start fresh and get familiar with the underlying technology such as QEMU, KVM and libvirt. In this series, we'll explore setting up a new installation of Ubuntu 22.04 LTS encrypted with LUKS, installing Cockpit, MergerFS & ZFS and deploying and managing VMs with Cockpit and on the CLI.
Note: Throughout the series, I'll be specifying the versions of some of the tools I'm using in an effort to make it's content more accessible by users using other Linux distributions.
Installing Ubuntu Server 22.04 LTS w/ LUKS
You can grab the latest ISO of Ubuntu Server from Ubuntu's website. I typically use Ventoy to boot the ISO directly from USB but you can also use Etcher to make a bootable USB flash drive from the ISO.
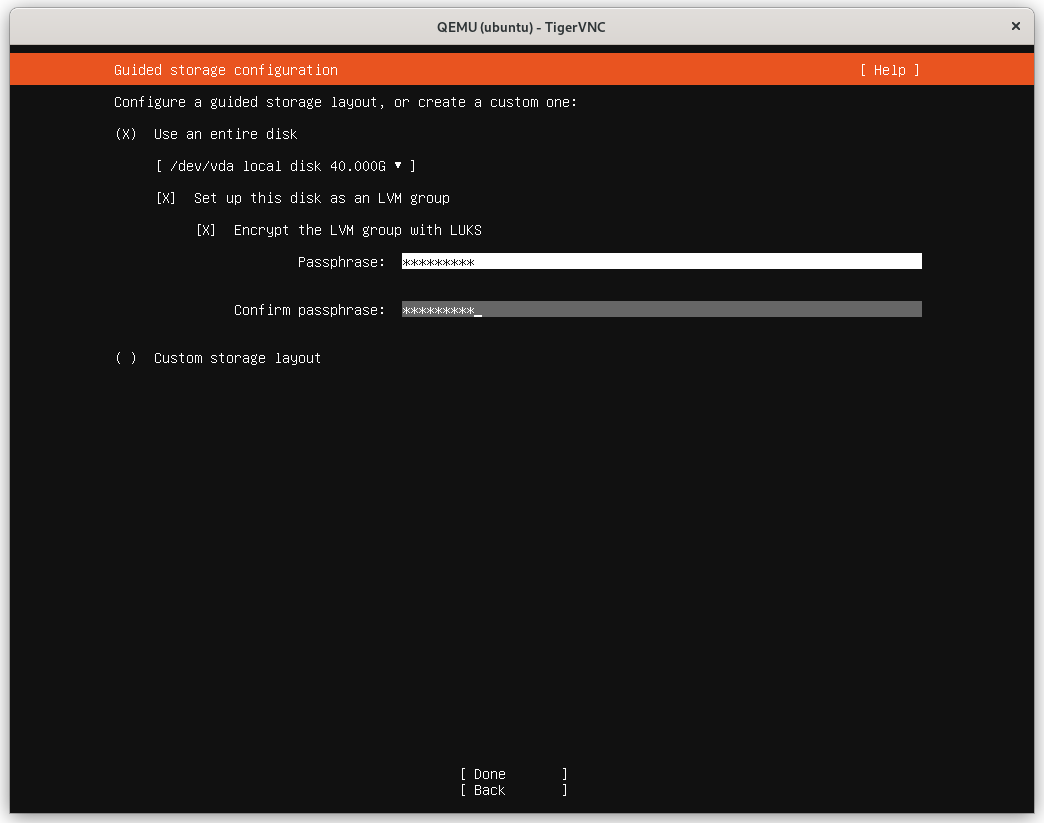
Installing Ubuntu is fairly straightforward. Once you get to the Guided storage configuration screen, you'll notice the selected option is "Use an entire disk". This does not actually use the entire disk, intentionally only allocating 50% of free space (see bug report) but we'll correct this later. For now, make sure Encrypt the LVM group with LUKS is selected and provide a passphrase:
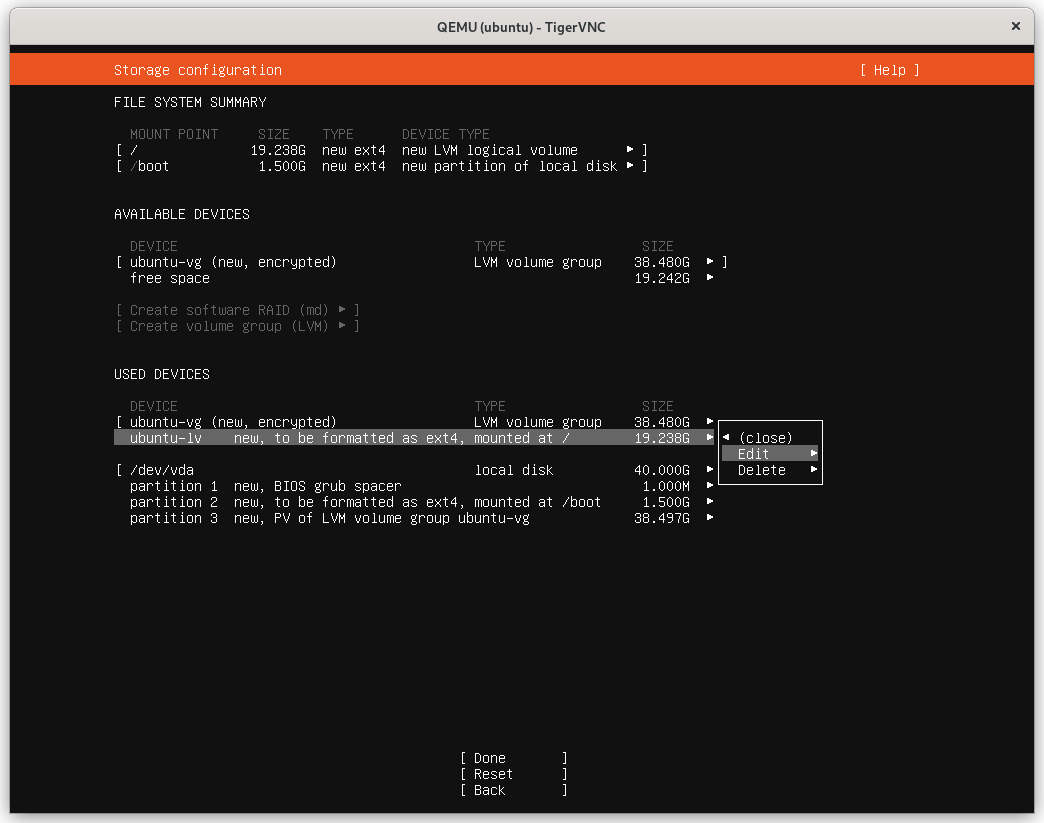
On the next screen, notice how our logical volume is only half the size of the volume group. I'm just going to use the entire disk here but you can setup additional logical volumes as needed.
Select the Logical Volume (LV) to edit:
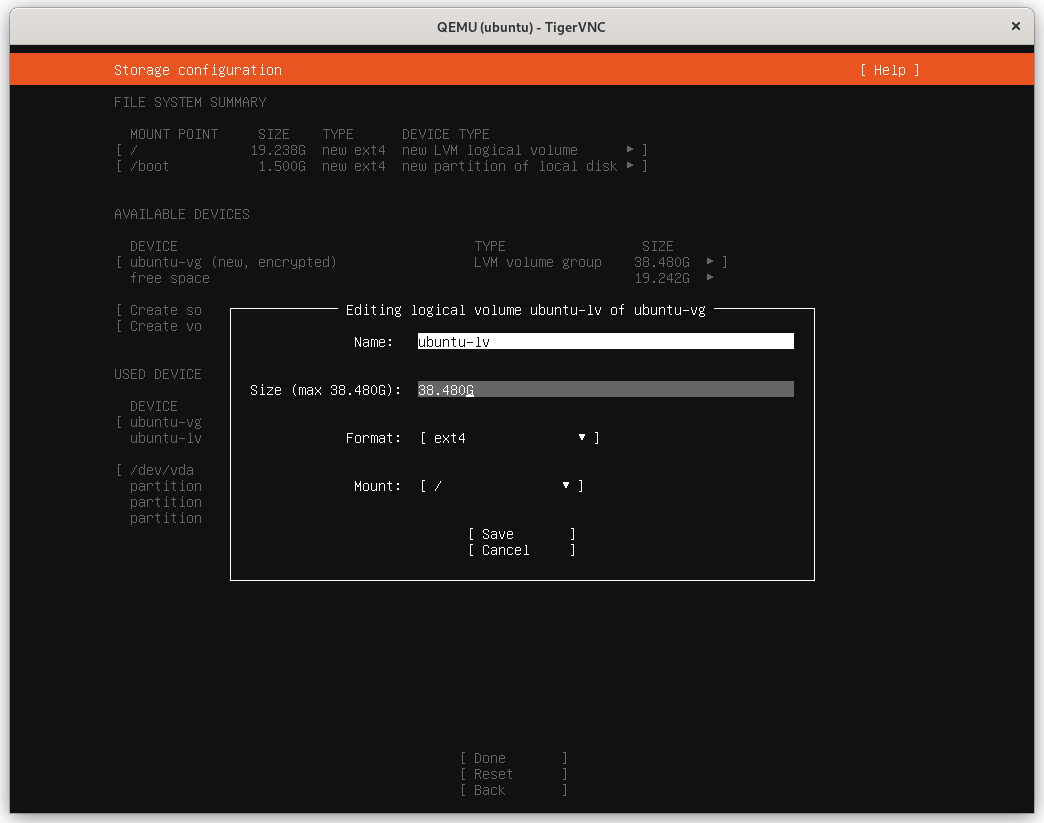
Modify the Size to use the maximum allowable capacity:
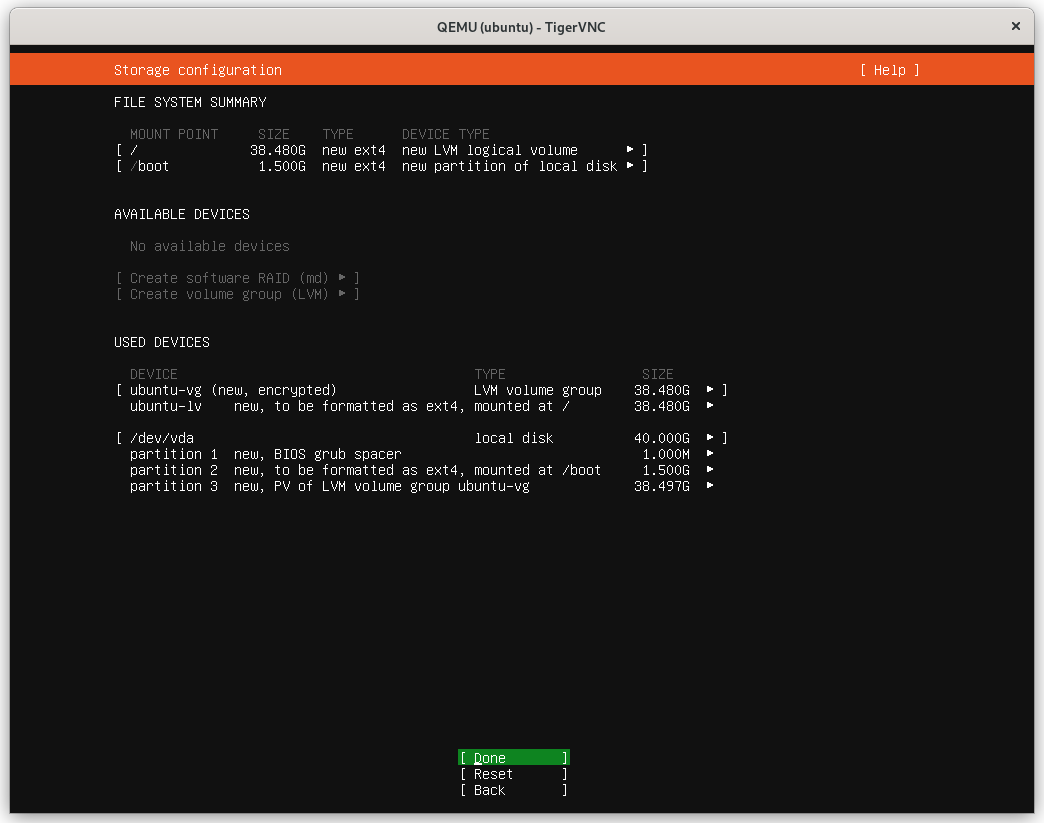
The layout now reflects the entire disk:
When prompted whether to install the OpenSSH Server, select it and optionally import your SSH key from GitHub/Launchpad:
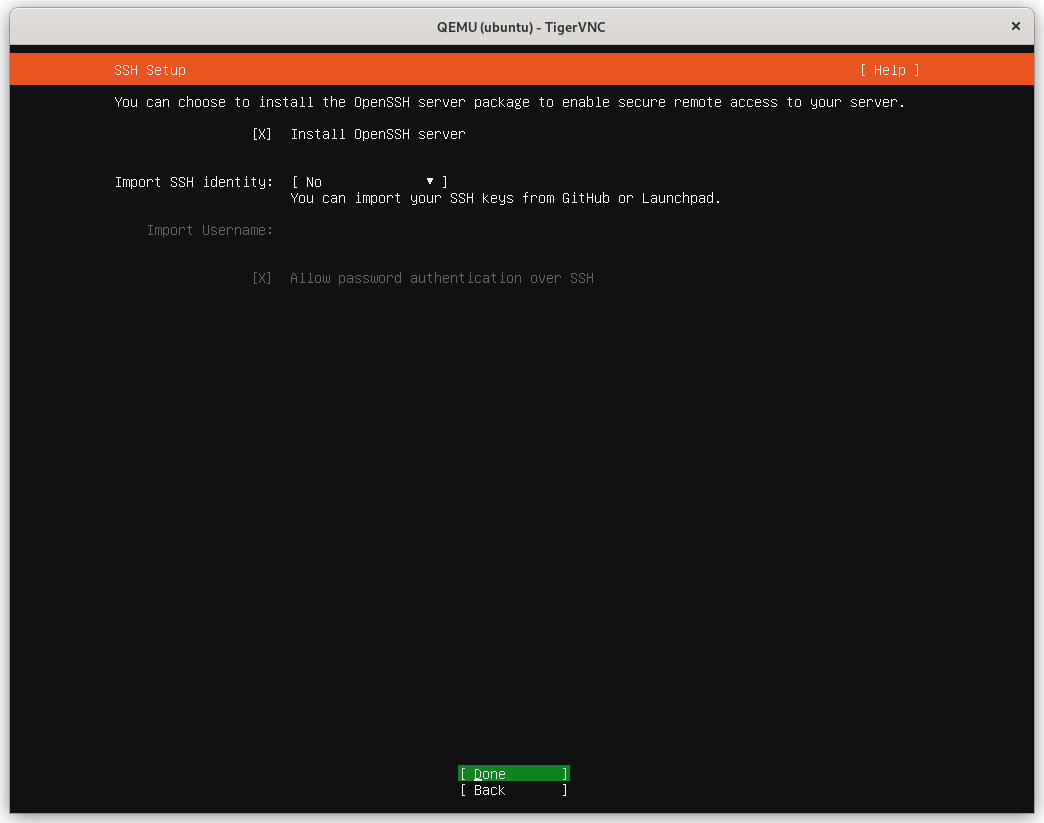
Note: The default SSH configuration located at
/etc/ssh/sshd_configshould be reviewed and adjusted to your needs. For example, password authentication is enabled by default and should be disabled in favor of SSH keys.
The installation will continue and update the system automatically. Once this completes, reboot and you'll be prompted to input your password:
Please unlock dm_crypt-0:
This isn't exactly ideal though. I don't always have physical access to the server to input my passphrase. Thankfully, that's where dropbear-initramfs comes in.
Unlocking LUKS remotely
dropbear-initramfs is a handy package that installs a lightweight SSH server (dropbear) into the unencrypted boot partition so that we can login remotely and enter the passphrase for LUKS and continue booting.
To install:
$ sudo apt install dropbear-initramfs
dropbear: WARNING: Invalid authorized_keys file, SSH login to initramfs won't work!

$ dropbear -V
Dropbear v2020.81
Don't worry about that warning. We'll generate our keys a bit later.
Configuring dropbear
Note: Earlier versions of dropbear-initramfs stored configuration files under
/etc/dropbear-initramfs. In the version I'm using (v2020.81) this has moved to/etc/dropbear/initramfsand is what I'll be referencing. Substitute the path to suit your installed version.
Open the file /etc/dropbear/initramfs/dropbear.conf in your preferred text editor:
$ sudo vim /etc/dropbear/initramfs/dropbear.conf
In this file you'll notice the DROPBEAR_OPTIONS line is commented out. It isn't required to change this but I'm going to specify a few options. Be sure to uncomment the line for your changes to take affect.
DROPBEAR_OPTIONS="-I 60 -s"
-I 60 tells dropbear to terminate any connection that is idle for 60 seconds
-s disables password logins
If this server is publicly accessible, disabling password logins will help bolster security. You can also change the default port (22) by specifying -p
Other options are available and can be found in the dropbear manpages: man dropbear 8.
(Optional) Configuring a static IP with initramfs
Most likely you're already using a static IP to connect to your server. This can be configured on your router through the use of DHCP reservations or locally in your servers' configuration.
If you've done the latter, we need to tell initramfs what IP address to use so we can connect to it later (otherwise DHCP will assign the next available IP address).
Open the file /etc/initramfs-tools/initramfs.conf and at the bottom we'll insert:
IP=<local-ip>::<gateway-ip>:<subnet-mask>
Note: There are two colons between the local-ip and gateway-ip. This is because we're omitting an option as it doesn't apply. For more information on the available options for IP, see the nfsroot section here under Kernel command line.
If you have multiple network interfaces you can specify the interface to use:
IP=<local-ip>::<gateway-ip>:<subnet-mask>::<interface>
Again, notice the two colons between subnet-mask and interface. This is because we're omitting the hostname option.
Here is an example of what mine looks like:
IP=10.10.24.10::10.10.24.1:255.255.255.0::enp1s0
Now that we've made changes to dropbear-initramfs and initramfs we need to update our boot image by running:
$ sudo update-initramfs -u
Configuring SSH Keys
We now have configured the system to start a dropbear SSH server during boot (just prior to asking for our LUKS passphrase) but we don't have any way of accessing it because we haven't setup our keys yet.
We're going to generate new SSH keys specifically for use with dropbear. It is recommended to do this on a client PC (private key should not be passed around) and then copy the public key to the server.
Note: Earlier versions of dropbear packaged with some distributions (Ubuntu 20.04 LTS) do not support ed25519 encryption. I found that using ECDSA worked just as well.
$ ssh-keygen -t ed25519 -f ~/.ssh/unlock_dropbear
Generating public/private ed25519 key pair.
Enter passphrase (empty for no passphrase):
Enter same passphrase again:
Your identification has been saved in ~/.ssh/unlock_dropbear
Your public key has been saved in ~/.ssh/unlock_dropbear.pub
Now that our keys have been generated, let's copy our public key to the server:
$ scp ~/.ssh/id_dropbear.pub [email protected]:
Note: I did not provide a path after 10.10.24.10: which means the file will be placed in our default path which by default is our home directory
/home/user.
Finally, we'll connect to our server, add this public key to dropbear and update initramfs:
$ ssh [email protected]
$ cat ~/id_dropbear >> /etc/dropbear/initramfs/authorized_keys
$ sudo update-initramfs -u
Testing our remote unlock
Now that we've configured dropbear, initramfs and provided dropbear with our public key, we're ready to test it out.
Reboot the server:
$ sudo reboot
Once it reboots, you may be presented with a few lines of IP-Config output showing the server connecting to the network. At the very bottom of the console, you'll see:
Begin: Starting dropbear ...
Please unlock dm_crypt-0:
From your local system, SSH into the server and enter cryptroot-unlock to be prompted for your LUKS passphrase.
$ ssh [email protected] -i ~/.ssh/id_dropbear


To unlock root partition, and maybe others like swap, run `cryptroot-unlock`.


BusyBox v1.30.1 (Ubuntu 1:1.30.1-7ubuntu3) built-in shell (ash)
Enter 'help' for a list of built-in commands.

# cryptroot-unlock
Please unlock disk dm_crypt-0:
Once you've successfully entered in your LUKS passphrase, the session will automatically close:
cryptsetup: dm_crypt-0 set up successfully
# Connection to 10.10.24.10 closed by remote host.
Connection to 10.10.24.10 closed.
Creating an alias for SSH
To make it a little easier to connect, we can add an entry to our SSH config at ~/.ssh/config to give this connection an alias. Open the file (or create it) and add:
Host unlock-server
	Hostname 10.10.24.10
	User root
	Port 22
	IdentityFile ~/.ssh/id_dropbear
Now we can just use the alias unlock-server to connect without the need to specify a username, IP, port or which private key to use:
$ ssh unlock-server
...

# cryptroot-unlock
Please unlock disk dm_crypt-0:
Conclusion
In this first part of the Migrating to Cockpit series, we installed Ubuntu Server 22.04 LTS with LUKS encryption and installed & configured dropbear-initramfs to provide us with remote access during the boot process to unlock our server.
Stay tuned for the next part in this series where we will download and compile the latest version of Cockpit and configure our network interfaces.